Ad

Showing posts with label Computer Education. Show all posts

File-Recovery - Computer Education


File-Recovery


@ TaiAhom.com Team


File-Recovery


File Recovery from Recycle Bin


When Microsoft introduced the Recycle Bin in Windows 95, it immediately became a failsafe for many users. If you delete a file and realize that you actually need it, you can recover it easily by doing the following: 


• Open the Recycle Bin by double-clicking on the Recycle Bin icon on your desktop (or you can go to the Recycle Bin folder in Windows Explorer). 


• Find the file you want to recover and click to highlight it. 


• Go to the File menu and choose the Restore option (or right click over the filename and select Restore from the context-sensitive menu). 


• The file is now back on your computer in its original place


While the Recycle Bin is a great utility, there are times that a file is not placed in the Recycle Bin when you delete it. These include files from removable storage such as floppy disks and Zip disks, files deleted from within some applications, and files deleted from the command prompt. Also, there are times that you will empty the Recycle Bin and then realize that there was a file you wanted to keep. 


A common misconception is that the data is actually removed from the hard drive (erased) when you delete a file. Any time that a file is deleted on a hard drive, it is not erased. Instead, the tiny bit of information that points to the location of the file on the hard drive is erased. 


This pointer, along with other pointers for every folder and file on the hard drive, is saved in a section near the beginning of the hard drive and is used by the operating system to compile the directory tree structure. 


By erasing the pointer file, the actual file becomes invisible to the operating system. Eventually, the hard drive will write new data over the area where the old file is located. 


There are several utilities that you can find on the Internet that allow you to recover "deleted" files. What these utilities do is search for data on the hard drive that does not have corresponding pointer information and present you with a list of these files. 


Your chances of fully recovering a file diminish the longer you wait after you deleted the file since the probability that the file has been overwritten increases. Sometimes you can recover portions of a file that has not been completely overwritten. 

File Compression - Computer Education,


File Compression


http://www.taiahom.com/


File Compression


Introduction 


In computer science and information theory, data compression or source coding is the process of encoding information using fewer bits (or other information-bearing units) than an unencoded representation would use through use of specific encoding schemes. 


For example, this article could be encoded with fewer bits if one were to accept the convention that the word "compression" be encoded as "comp." One popular instance of compression with which many computer users are familiar is the ZIP file format, which, as well as providing compression, acts as an archiver, storing many files in a single output file.


As with any communication, compressed data communication only works when both the sender and receiver of the information understand the encoding scheme. For example, this text makes sense only if the receiver understands that it is intended to be interpreted as characters representing the English language. Similarly, compressed data can only be understood if the decoding method is known by the receiver.


Compression is useful because it helps reduce the consumption of expensive resources, such as hard disk space or transmission bandwidth. On the downside, compressed data must be decompressed to be viewed (or heard), and this extra processing may be detrimental to some applications. 


For instance, a compression scheme for video may require expensive hardware for the video to be decompressed fast enough to be viewed as it's being decompressed (the option of decompressing the video in full before watching it may be inconvenient, and requires storage space for the decompressed video). 


The design of data compression schemes therefore involves trade-offs among various factors, including the degree of compression, the amount of distortion introduced (if using a lossy compression scheme), and the computational resources required to compress and uncompress the data.


By compressing, you "zip" the file so that it is smaller and requires less disk space. Zipping a file is especially helpful if you are planning to send the file as an e-mail attachment or transfer it to another computer. 


File Compression


Compressing File with WinZip 


Steps


Step One - Open WinZip.


Step Two- Click on the New icon. A window will open displaying the folders on your disk.


Step Three - Move through the folders until you locate the folder where you want to store your compressed file.


Step Four- WinZip creates a file called an "archive." Name your archive.


Step Five- Click Save. You will be returned to the WinZip main window.


Step Six- You must now add a file to the archive that you have just created. Click on Add. A window will open displaying the files and folders on your disk.


Step Seven- Move through the folders until you locate the file that you want to compress. Select that file.


Step Eight- In the compression menu, select the level of compression that you want. The choices may include Normal, None, Fast, Superfast and Maximum.


Step Nine- Add an optional password, if desired.


Step Ten- Click Add. You will return to the main WinZip menu.


Step Eleven- Your compressed file is now added to the archive.


Step Twelve- Close WinZip


Tips & Warnings


• If you have configured your WinZip to display the number of bytes before and after compression, you will be able to see your savings in the WinZip window after you have added the file.


• If you transfer your zipped file (archive) to another computer, the file will not open unless there is a decompression utility installed on that computer.(It doesn't need to be WinZip. Check with your recipient to see what kind of compression software he or she uses and what formats the software can decompress.)


File Compression


Compressing file in Windows XP 


Windows XP comes with a built in file compression/ ZIP creation utility. This utility can also be used to Create ZIP Archives and UnZIP zip files.


Creating a ZIP folder with Windows XP


Follow these simple steps to create a ZIP file with Windows XP:


1. Select the file(s)/folder(s) that you want to add to ZIP then Right-Click and select Compressed (zipped) folder from Send To menu from the shortcut menu:


Windows XP  http://www.taiahom.com/


Note: You can use Ctrl+ Click to select multiple files and in case you have multiple files selected then use Ctrl + Right-Click instead of Right-Click 


As you can see Windows XP has created a compressed the selected folders in a zip archive. 


file_compress  http://www.taiahom.com/


UnZIPping contents from compressed folder 


Follow these steps to unzip content from ZIP archive in Windows XP:


1. Select the archive that you want to UnZip and Right-Click on the archive.


2. Select Extract All option from the shortcut menu.


http://www.taiahom.com/


3. Compressed Folder Extraction Wizard will be displayed. Click on Next to Continue with the wizard.


Wizard   http://www.taiahom.com/


Select the location where you want to keep the extracted contents and Click on Next to extract the contents.


Wizard01   http://www.taiahom.com/


Wizard02   http://www.taiahom.com/


Wizard has successfully extracted the contents of the ZIP to the selected location, now Click on to complete the wizard and view the extracted contents.


Introduction to Disk Defragmentation - Computer tips


Disk Defragmenter 


http://www.taiahom.com/


Introduction to Disk Defragmentation 


As advanced as hard drives have become, one item they are not very good at is housekeeping, or maybe that should be drive keeping. When files are created, deleted, or modified it's almost a certainty they will become fragmented. Fragmented simply means the file is not stored in one place in its entirety, or what computer folks like to call a contiguous location. Different parts of the file are scattered across the hard disk in noncontiguous pieces. The more fragmented files there are on a drive, the more performance and reliability suffer as the drive heads have to search for all the pieces in different locations. The Disk Defragmenter Utility is designed to reorganize noncontiguous files into contiguous files and optimize their placement on the hard drive for increased reliability and performance. 

Why Defrag Disk? 


Fragmentation is caused by creating and deleting files and folders, installing new software, and downloading files from the Internet. Computers do not necessarily save an entire file or folder in a single space on a disk; they're saved in the first available space. After a large portion of a disk has been used, most of the subsequent files and folders are saved in pieces across the volume. 


When you delete files or folders, the empty spaces left behind are filled in randomly as you store new ones. This is how fragmentation occurs. The more fragmented the volume is, the slower the computer's file input and output performance will be. 

http://www.taiahom.com/


Defragmentation is the process of rewriting non-contiguous parts of a file to contiguous sectors on a disk for the purpose of increasing data access and retrieval speeds. Because FAT and NTFS disks can deteriorate and become badly fragmented over time, defragmentation is vital for optimal system performance.


Disk Defragmenter


Using Disk Defrag on Windows XP 


Accessing Disk Defragmenter 


Start | All Programs | Accessories | System Tools | Disk Defragmenter


Start | Run | and type dfrg.msc in the Open line. Click OK


Start | Administrative Tools | Computer Management. Expand Storage and select Disk Defragmenter


The first two methods take you to a standalone window containing Disk Defragmenter. The last method opens Microsoft Management Console and displays Disk Defragmenter as one of the snap-in modules. In all cases, a window similar to the one below will be displayed.;


windows xp  http://www.taiahom.com/


When Disk Defragmenter first opens (Fig. 01) you'll see a list of the hard drives displayed at the top of the screen. The Estimated Disk Usage Before Defragmentation and Estimated Disk Usage After Defragmentation will be blank until a drive is selected and the Analyze button is clicked. In the screen shot above, I've already analyzed the drives as evidenced by the Session Status showing as Analyzed and the Estimated Disk Usage Before Defragmentation area containing a graphical representation of the drive fragmentation.


degragment button  http://www.taiahom.com/


After the Analyze button has been clicked and the process completes the window shown above (Fig. 02) opens with a brief recommendation of what action Disk Defragmenter thinks should be taken regarding the drive. It's important to note that this is just a recommendation based on the percentage of fragmented files to total files and doesn't prevent the drive from being defragmented if you feel it needs to be done and might improve system performance. If you want to go ahead and defragment without more information, click the Defragment button. If you're in agreement with their recommendation and don't want to defragment, click the Close button. Click the View Report button to view a more detailed drive analysis.


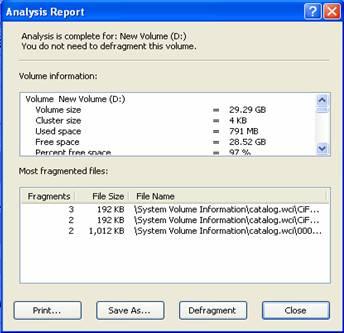
analysis report   http://www.taiahom.com/


An Analysis Report contains quite a bit of additional information about the selected drive. The report shown above (Fig. 03) details the File Fragmentation status of drive New Volume (D:). The top pane provides Volume information, and as you can see there are 3,851 fragmented files. This may not seem like many fragmented files, but consider that this is only a 29GB drive, which is very small by today's standards, and that 97% of the total drive space is currently unused. Look at the Average Fragments Per File number of 1.04 and this tells you that approximately 4% of the files on the drive are in two or more pieces. My experience has been that when this number reaches 1.05 the message in the quick analysis window (Fig. 02) will recommend defragmenting the drive. The bottom pane, Most Fragmented Files, lists the files in descending order that are the most fragmented.


Click on Defragment button to Defrag the drive.


drive   http://www.taiahom.com/


You can see the status of Defragmentation in the status bar.


status   http://www.taiahom.com/


Disk defragmentation is now complete, click on View Report button to view the Defragmentation Report.


defrag report  http://www.taiahom.com/


analize   http://www.taiahom.com/


In spite of the recommendation not to defragment this particular disk, I went ahead and clicked the Defragment button. The results of that choice are shown above (Fig. 04) in the Estimated Disk Usage After Defragmentation section. The graphical representation clearly shows that not only have the red lines depicting fragmented files been eliminated, many of the contiguous files indicated by the blue have been repositioned toward the beginning of the drive, reducing the amount of searching the drive heads have to do to locate a file. The drive in this example is not a system drive, nor does it have a paging file which would be indicated by the lime green Unmovable Files color.


After the defragmentation process completes, clicking the View Report button will bring up the Defragmentation Report (Fig. 05). It takes the exact same form as the Analysis Report (Fig. 03) but shows the post defragmentation results. The Total Files and Average File Size remain identical, but notice that Total Fragmented Files and Total Excess Fragments have been reduced to zero (0) and the Average Fragments Per File is now 1.00, indicating most or all of the files are contiguous. In addition, there are no files listed that did not defragment.


www.TaiAhom.com © all rights reserved
made with by 𑜋𑜈𑜫 𑜑𑜦𑜧 ‌‌𑜉𑜨𑜃𑜫 ‌‌𑜄𑜦𑜡 𑜇𑜥‌‌ ‌ 𑜀𑜦𑜧